
User Guide
Basic Operations
Device Buttons
Designed for intuitive control, our physical buttons let you quickly access AiLight’s core features. Below is a clear layout of button positions and functions.
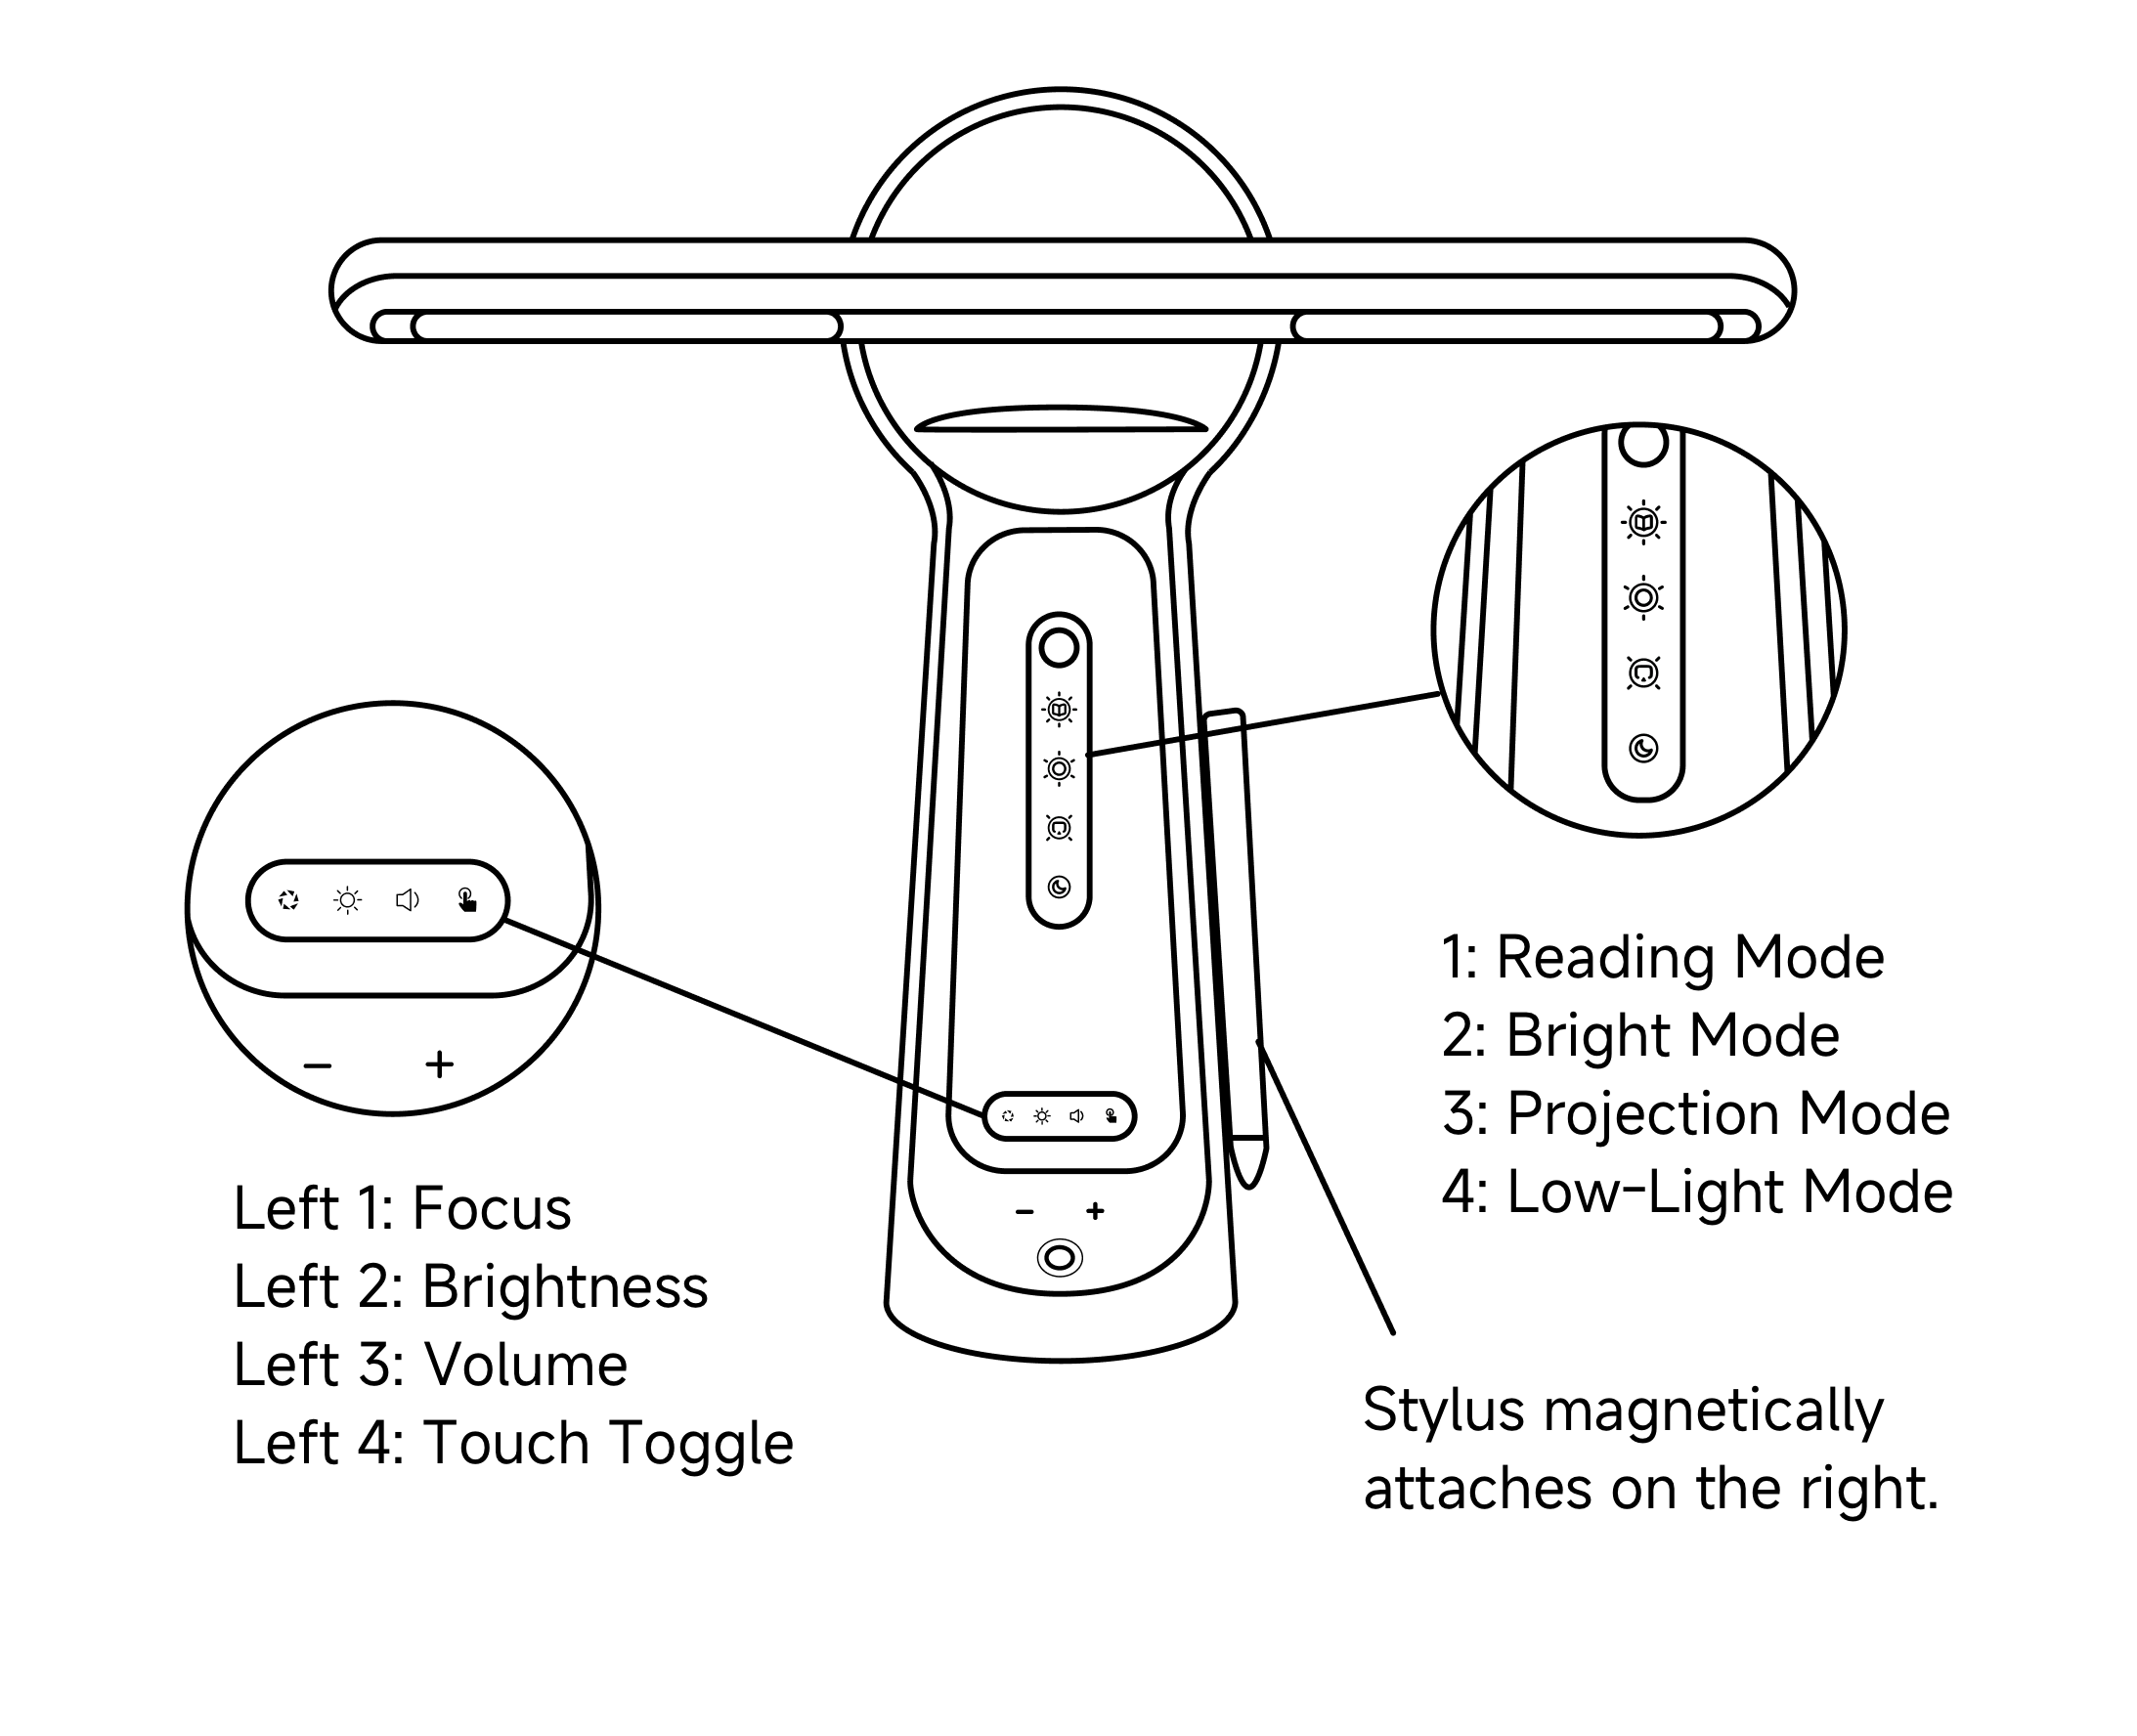
Lighting Modes
AiLight offers four preset lighting modes—switchable with one tap—to suit different learning and ambient needs.
- Read Mode: Focused, fatigue-free reading
Optimized color temperature and brightness mimic natural daylight, reducing eye strain during long reading or writing sessions. - Bright Mode: Sharp, shadow-free precision
High-brightness, high-CRI lighting ideal for detailed tasks like writing or drawing—clear details, zero shadows. - Project Mode: Glare-free viewing
Engineered light distribution minimizes screen glare, creating a comfortable environment for watching or studying. - Low Light Mode: Soft, night-friendly glow
Ultra-low brightness with warm tones creates a calming ambiance—gentle on the eyes, perfect for evening use.
Core Controls
- Focus Button
Press to adjust projection sharpness using the “+” and “-” buttons. - Brightness Button
Press to adjust projection brightness for any environment. - Volume Button
Press to control media playback volume with “+” and “-”. - Touch Mode Button
Toggle between “Finger Touch” and “Stylus Priority” modes. - Power/Home Button
- Power On: Hold for 3 seconds while powered off.
- Home: Tap once while powered on to return instantly to the home screen.
Unboxing & Setup
For optimal performance, complete these steps before first use:
- Check Contents
Verify all items: main unit, stylus, silicone projection screen, and accessories per the packing list. - Lay the Screen
Place the silicone projection screen flat on a clean, level surface. - Position the Device
Center the AiLight unit on the screen, aligning with the cross-marked target area. - Attach the Stylus
Snap the stylus into its designated dock (typically on the right side of the unit). - Remove Protective Films
Peel off all factory-applied protective films from the device surface. - Connect Power
Plug the adapter into the rear port, then into a power outlet.
Power On, Login & Update
Power On & Account Setup
- Power On: Hold the power button for 3 seconds until the logo appears.
- Connect Wi-Fi: Follow on-screen prompts to connect to a network.
- Sign In/Sign Up: Enter your phone number to receive and verify a code.
- Add Child Profile: Complete your child’s profile after login.
- Ready to Go: The system will auto-launch to the home screen.
System Updates
Device system (firmware) updates are now centrally managed under “Software Updates.”
- When connected to the internet, you’ll receive a notification on the home screen or in the system menu if a new version is available.
- You can also manually check for updates by going to “App Market” and selecting the “Firmware Update” section.
- Tap “Update” and follow on-screen instructions to complete the download and installation.
- Note: Keep the device powered and connected to a stable network during the update.
Auto Power On/Off Settings
- Tap the System Menu icon in the top-left corner of the screen.
- Go to “User Guide” and tap “Settings.”
- Locate “Auto Power On/Off” and enable it.
- Set your preferred auto power-on and power-off times separately.
- Once set, the device will perform these actions daily at the specified times.
App Market Guide
The “App Market” is your central hub for discovering, managing, and updating all apps and system software on your device.
How to Access
Access the “App Market” via any of the following:
- Tap the System Menu in the top-left corner, then select “Software Updates.”
- On the home screen, tap the “My Apps” entry.
- Find and tap the “App Market” icon in the lower-right section of the home screen.
Key Sections
“Software Updates” includes the following sections for easy management:
- App Market
- Early Learning: Cognitive and language apps for preschoolers and young children.
- Edutainment: Apps for logic training, creative drawing, and interactive storytelling.
- Utilities: Tools like screen mirroring and Tencent Meeting.
- Online Class Hub: Centralized access to leading online education platforms.
- Recommended Apps
This section shows installed learning and third-party apps. Long-press an app icon to uninstall if no longer needed. - System Apps
This section contains core built-in learning and utility apps. When updates are available, you can “Update All” with one tap or update individual apps. - Firmware Updates
Check and install hardware-level system updates to access the latest features and performance improvements. - My Apps Displays all installed apps. To uninstall, long-press the app icon on this page.
Tip: If you uninstall a built-in system app from “My Apps,” reinstall it from the “System Apps” section.Use the AiLight Mini Program to manage app downloads.
AI Tutor
Homework Grading
- Access: Tap the “Homework Grading” tile on the home screen.
- Workflow:
- Place Paper: Lay the handwritten assignment flat in the left scanning zone.
- Select Subject: Choose “Homework Grading” in the right toolbar, then pick the subject or enable auto-detection.
- Scan & Grade: Tap “Scan” — AI instantly recognizes and grades problems.
- Review Results: Left side shows original paper with markups; right side displays detailed explanations. Tap “Explain” at the bottom to launch BINGO, which uses Socratic questioning to guide your child toward independent problem-solving.
Problem Solving
- Access: Tap the “Problem Solver” tile on the home screen.
- Workflow:
- Place Paper: Lay the assignment flat in the left scanning zone.
- Select Subject: Choose “Problem Solver” and pick the subject in the right toolbar.
- Scan & Solve: Tap “Scan” — AI analyzes and breaks down the solution.
- Review Results: Right side shows step-by-step reasoning to help your child understand the logic.
Essay Feedback
- Access: Select “Chinese Essay” or “English Writing” from the home screen.
- Workflow:
- Place Essay: Put the paper in the left scanning zone. Choose “Basic Feedback” or “Deep Analysis” on the right.
- Scan: Tap “Scan” — if the essay spans multiple pages, add them sequentially.
- Results: AI scores across multiple dimensions and highlights strengths and areas for improvement. Outstanding phrases and errors are annotated directly on the original text via AR.
Listening & Dictation Practice
- AccessOption 1: On the home screen, tap the Bingo icon in the top right, then switch to dictation mode in the top left.
Option 2: Or go directly from the home screen via the Dictation entry, or select “Listening Practice” in the AI Tutor section. - Workflow:
- Place Content:
Lay the word sheet or test paper flat in the left scanning area. - Scan & Upload:
Tap “Scan” to capture content. Supports multi-page continuous scanning and free cropping. Tap “Upload” when done. - Review Content:
The recognized text appears on the right. Filter to keep only Chinese characters or letters as needed. Edit if recognition differs from the original. - Start Dictation:
After confirming, tap “Start Dictation.” When your paper and pen are ready, tap “Ready” to begin - During Dictation:
Set the interval between words to match your pace. The system auto-plays words sequentially. Tap “Previous” to replay; if you don’t tap “Next,” it continues automatically. - Finish & Check:
After dictation, choose “Redo” or “Check.” Tap “Scan” to capture your written work for detailed correction. - View Results:
Once checked, correct and incorrect answers are marked directly on the original text.
- Place Content:
Language Translation
- Access: Select “English Translation” from the home screen.
- Workflow:
- Place the source text in the left scanning zone.
- Choose translation direction (EN→CN or CN→EN) on the right.
- Use Stylus: Highlight text directly — translation appears instantly on the right, with optional voice playback.
Creative Design
Creative Poster
- Access: From the device home screen, tap the “Poster Designer” button to open the Creative Design page.
- Workflow:
- Start Designing
You can either scan a hand-drawn poster sketch or tap “Start Now” to begin without a draft. - Set Content & Style
First, select a grade level and enter your poster topic. For more customization, choose from additional layouts, design styles, color schemes, or add detailed instructions for text and visuals. - Generate Your Poster
Tap “Generate”, and the system will automatically create your hand-copied poster. - View & Use
Once generated, the complete poster and text appear clearly on the right. Tap the image to zoom in for details. Using the smart projection and paper interaction feature, simply place a sheet of paper in front of your device and trace the projected image with pen and paper to easily draft and complete your poster.
- Start Designing
Picture Books
- Access
Enter AI One-on-One Tutoring, click "Creative Design" to access Picture Books. - Workflow
- Start Creating
Scan a brief sheet, or tap “Start Now” without one. - Set Story and Style
Enter a theme; select a visual style and text style; add custom requirements (for text and illustration). - Generate and Preview
Tap “Generate” — the system creates your storybook automatically. Tap to preview.
- Start Creating
Smart Point-and-Read
- Access
Go to AI 1-on-1 Tutor and tap “Smart Reading.” - Workflow
- Start Scanning
After entering Smart Reading, place the item on the left. On the right, select the matching category, then use the stylus to drag and select the recognition area—or tap the “Scan” button.
- Start Scanning
- Explore & Interact
After scanning, knowledge expansion will be displayed on the right for further learning.- Learn More
Click to view comprehensive background information and expand knowledge. - Knowledge Cards
The system will automatically summarize core knowledge points into cards for easy learning and memorization. - Smart Reports
For academic content (e.g., textbooks), generate a structured Smart Report. - Chat with Bingo
Discuss the recognized content with Bingo via voice for deeper insights.
- Learn More
Sync Learning
Sync Learning covers K–12 subjects, fully aligned with national curricula. Structured around pre-class preview, in-class instruction, post-class review, and quizzes, it reinforces classroom learning and builds comprehensive knowledge.
How to Access
- Tap the “Full Subject Sync Learning” tile in the home screen’s recommended section.
Core Actions
- Select Grade & Subject: Choose your child’s grade level and subject upon entry.
Textbook Management
- Add Textbook
- Open Sync Learning;
- Select grade and subject;
- Tap “Switch Textbook”;
- Choose the correct publisher and edition from the full list;
- Tap “Download” to add to “My Textbooks.”
- Switch Textbook
Tap any downloaded textbook cover in “My Textbooks” to switch instantly. - Delete Textbook
In “My Textbooks,” open the manage/edit menu and select textbooks to remove.
BINGO Voice Assistant
How to Activate
Call BINGO in any of these ways:
- Voice Wake: Say “BINGO, BINGO” facing the device.
- Manual Trigger:
- Tap the BINGO icon in the top-right corner of the home screen;
- Or tap “Explain” during Homework Grading or other AI features.
Conversation Modes:
- Default Mode:
Talk directly with Bingo for instant knowledge Q&A, learning support, and growth conversations anytime. - Guided Tutoring:
Socratic questioning guides step-by-step—without giving answers—to develop independent thinking and reasoning skills. - Dictation:
Supports dictation of words, characters, phrases, sentences, and classical poems. Scan book content for self‑paced practice. - Speaking Practice:
One‑on‑one real‑time English speaking practice for self‑guided improvement. - Posture & Focus Challenge:
Posture & Focus Challenge: Set a duration and open the camera cover. Your posture and focus are monitored in real time, with a detailed report after each session.
Account System
AiLight supports multiple user accounts. Manage family members and switch student profiles instantly via Personal Center for personalized learning paths and progress tracking.
How to Switch Users
- From any screen, tap your profile avatar in the top-right corner to open “Personal Center.”
- At the top of Personal Center, tap the current student’s name.
- A list of all added members appears. Scroll up/down to view more.
- Tap the target member’s avatar or name to switch. The device loads their personalized learning environment.
Managing Members
In the expanded member list, you can manage entries for easier access: - Sort Members: Tap “Sort” to order by addition time or nickname.
- Find a Member: For large lists, type a nickname in the search bar at the top, to quickly locate a specific member.
VIP Benefits
The Smart Light VIP Membership is designed to provide users with more in-depth and personalized learning support. Upon activation, you will enjoy exclusive privileges.
View VIP Benefits
You can view exclusive VIP benefits through the following steps:
- On the home screen, tap your profile icon in the top-right corner to enter "Personal Center."
- In the Personal Center page, locate and tap the "Membership" or "VIP Center" entry.
- You can then browse the complete introduction to membership benefits and access direct entry points to each benefit page.
VIP Membership Benefits
In addition to all basic services, VIP users enjoy exclusive benefits or higher quotas across multiple core learning features. For details, please refer to the VIP Center page.
VIP Information
On the Personal Center interface, tap the VIP icon to access the VIP Information page.
- Purchase/Renewal: Confirm your current membership status and select the corresponding plan to purchase or renew.
- Redeem VIP:If you have a VIP activation code, you can enter it here for redemption. Please carefully read the activation instructions on the page before proceeding.
- Purchase Credits:Credits can be used to redeem certain services or benefits, as well as for computing power consumption of AI features. Here, you may choose from preset credit bundles or manually enter the desired credit amount. After confirming and agreeing to the payment terms, you can complete the payment via WeChat Pay or Alipay.
- Expense Center:Manage account spending and benefit records in one place.
- Transaction Details: Displays the transaction status of all orders, including credit purchases, membership activations, and more.
- VIP Activation History: View the type and time of each VIP activation or renewal.
- Credit Transactions: Detailed records of all credit deductions and additions to your account.
Credit Usage Policy
Some AI learning services require credit consumption. VIP members enjoy more favorable credit deduction policies.
| Event | Regular User | VIP Member |
|---|---|---|
| Homework Grading | 10 | 10 |
| Problem Solving | 10 | 10 |
| Essay Feedback | 10 | 10 |
| Creative Design Poster | 100 | 100 |
Credit Rewards Policy
| Event | Regular User | VIP Member |
|---|---|---|
| Sign-up Bonus | 500 | 5000 |
| Daily Login Bonus | 50 | 50 |
| Monthly Bulk Bonus | 500 | 5000 |
More Apps
- Character Learning: Animated stroke order + native pronunciation for effortless character mastery.
- Draw: Large-screen doodling and creative painting to spark imagination.
- Piano: Virtual keyboard with parent-child duet mode—learn music through play.
More apps available in-app. Explore to discover.
AiLight Parent App
How to Access
Search “AiLight” in WeChat and open the mini-program.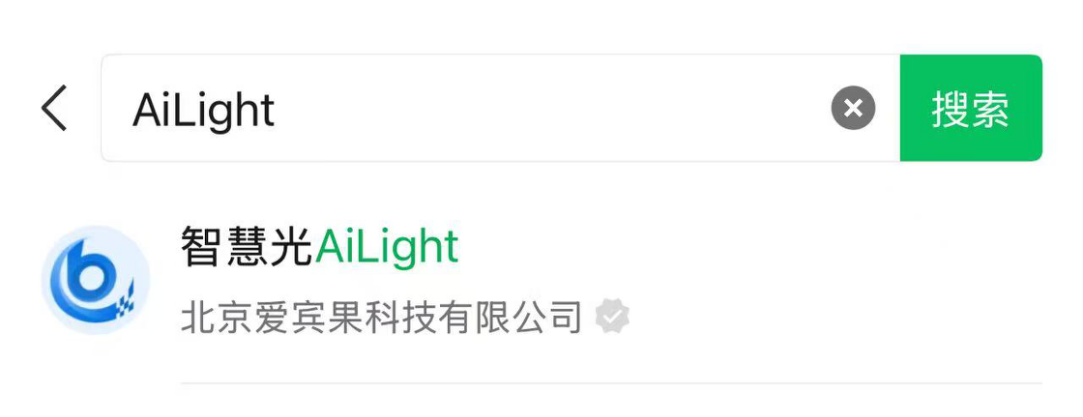
Account Linking
Use the same phone number as your AiLight device.
Parent Features
- Add or Switch Children
Tap a child’s name → “Add Child” → switch between profiles instantly. - Edit Profile
Go to Settings to update your child’s details anytime. - Set Daily Screen Time
Use “Total Usage Limit” to set daily usage caps and build healthy habits. - Set a Safety Passcode
To promote healthy usage, set a “Safety Passcode” via the parent app.- Function: Once enabled, kids must enter this passcode to view graded answers or install new apps.
- How to Set: Open the parent app → Device Management → Safety Settings → Safety Passcode. Follow prompts and remember your code.
- This helps parents reduce answer dependency and control app installation permissions.
- Posture & Focus Challenge
Designed to encourage proper posture and boost focus during study sessions.- ○Access: Open the mini program, go to Settings, and select “Posture & Focus Challenge.”
- ○Usage & Insights:
- During the challenge, the device logs posture and task completion.
- After completion, a summary report is auto-generated with performance feedback.
- Parents can view detailed historical records and analytics in the AiLight mini program to track habit development.